The Fast Answer On Rainscreen Requirements In Coastal BC
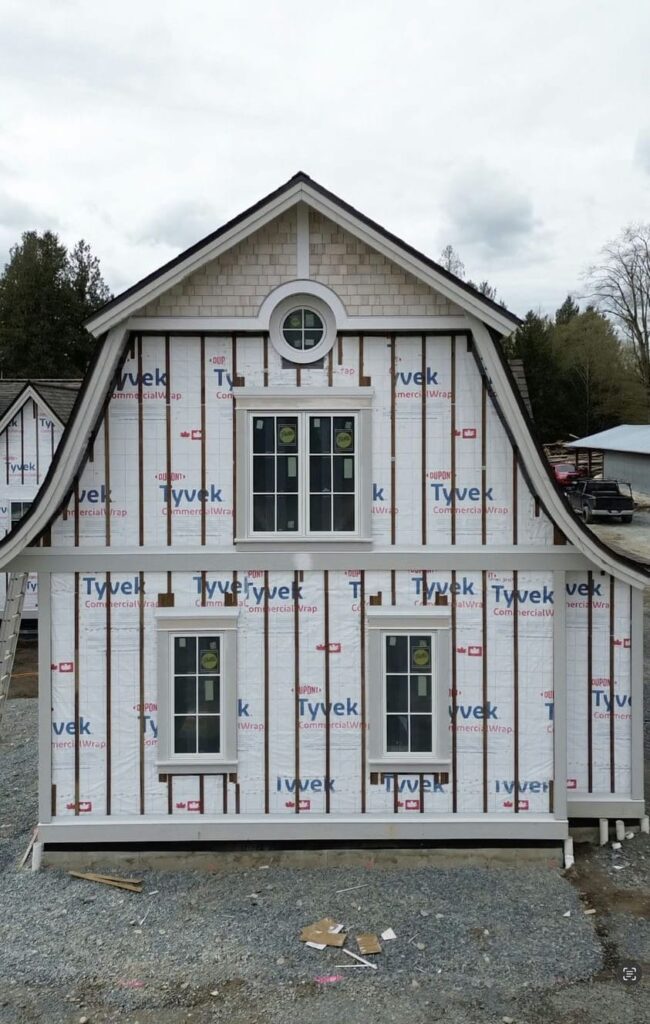
In a wet coastal climate, a rainscreen is less about “if water gets in” and more about “what happens when it does.” The practical goal is a wall that can drain and dry, so small wetting events do not turn into trapped moisture and long-term damage. That planning needs to start during your custom home’s architectural design phase, because rainscreens affect wall thickness, window details, cladding attachments, and inspection timing.
Here’s what you should plan for early if you want a rainscreen that performs in Greater Vancouver: extra assembly depth (your walls get thicker), clear top and bottom terminations (vents and bug screens), proper flashing at every opening, and a coordinated approach to penetrations and attachments (lights, hose bibs, railings, canopies).
What A Rainscreen Is And Why Coastal BC Treats It Differently
Coastal BC walls get hit with long wet seasons and wind-driven rain. That means a “good-looking” exterior is not the same as a durable wall. Rainscreens are one of the key ways builders manage moisture risk in this region, because they add a second line of defence and a way for assemblies to dry.
When people say “rainscreen requirements,” they often mean two different things: what the code and local authorities expect, and what best practice looks like in a wet climate. For most custom homes here, you want both, and you want the details clear enough that trades can build them consistently.
What A Rainscreen Is
Think of the cladding as the first surface that gets wet, and the water-resistive barrier (WRB) as the layer that should stay continuous behind it. The rainscreen cavity is the space between them. It helps break capillary action, provides drainage, and (when designed properly) supports drying.
A rainscreen is not “waterproof cladding,” and it is not “just strapping.” It’s a system of layers and terminations that has to be detailed at edges and openings. The cavity only works if water can get out and air can move enough to support drying.
Coastal BC Reality: Wind-Driven Rain And Slow Drying
In the Lower Mainland, rain is not just frequent. It is often wind-driven, and it hits walls that would stay relatively dry in other climates. That increases the moisture load on the whole wall assembly, including joints, corners, and openings.
Drying is the other half of the story. During long wet stretches, assemblies have fewer drying opportunities, which is why coastal waterfront homes carry the highest envelope risk of any build type in this region. A rainscreen improves your odds by providing a drainage plane and a drying path behind the cladding, instead of trapping moisture tight against the WRB.
Where “Requirements” Come From
Rainscreen expectations can come from the BC Building Code framework, local bylaws, and municipal bulletins and inspection practices. Vancouver, in particular, has historically provided specific guidance on rainscreen design and inspection that influences how projects are reviewed.
The practical takeaway is simple: treat rainscreen planning as a baseline for coastal durability, then confirm the details and documentation approach with the authority having jurisdiction and your design team.
Vancouver Vs Other Municipalities: What Changes In Practice

If you build across Greater Vancouver, you quickly learn that “the rules” are not always applied the same way everywhere. The core building science does not change, but documentation expectations and inspection focus can.
The safest approach is to design your rainscreen clearly enough that it meets the intent regardless of where the project is located. Then you can adjust the permit package and inspection sequence to match the municipality.
Vancouver’s Rainscreen Bulletin And Inspection Mindset
The City of Vancouver publishes a rainscreen bulletin that lays out how it approaches rainscreen design and inspection for one- and two-family dwellings. Even outside Vancouver, it gives a useful benchmark for the assembly clarity that municipal reviews tend to expect.
This matters because rainscreens are easy to “assume” and hard to fix once cladding is installed. A bulletin like this reinforces a key lesson: if the intent is not shown and inspected at the right time, you are relying on luck.
A Simple Way To Avoid Overgeneralizing “BC Requires It Everywhere”
Homeowners often hear “rainscreens are required” and assume the same detail is mandatory in every municipality, for every home, in every condition. In practice, requirements can vary depending on exposure, assembly choice, and how local authorities interpret and enforce documentation and inspection.
A better way to think about it is: in coastal BC, rainscreens are a durability strategy you should plan for unless a qualified professional has a clear reason not to. That keeps you from value-engineering away moisture resilience and paying for it later in repairs.
Local Code Context Helps You Avoid Redesign Later
Understanding Vancouver building bylaw design considerations helps set expectations around assembly clarity, detailing, and permit coordination before design is locked in.
Even outside Vancouver, the habit is useful: align the design intent to the local review environment early, so you do not redesign details after the set is already coordinated.
The Rainscreen System: Layers You Need To Coordinate Early


A rainscreen only performs when its layers work together. That means the WRB has to be continuous, the drainage space has to drain, terminations have to stay open, and flashings have to direct water out. If any one of those breaks, the wall can trap moisture.
This is also why rainscreen planning belongs in the drawing set, not just in someone’s head. Trades need a consistent detail to follow, especially at openings, transitions, and penetrations.
Water-Resistive Barrier And The “Second Plane”
The WRB is the layer behind the cladding that should remain continuous and act as the second plane of protection. It is where you want to manage water that gets past the cladding and direct it back out.
Continuity is the hard part. WRB continuity fails at corners, changes in material, penetrations, and around openings. If your details do not show how the WRB ties into flashings and transitions, the wall becomes dependent on caulking and hope.
Drainage And Drying Space
The cavity is there for drainage and drying. It gives water a path down and out instead of letting it sit against the WRB. It also helps the assembly dry after wetting events, which is crucial during long wet stretches.
This is where “nominal space” is not enough. If the cavity is blocked by compressions, debris, poorly terminated wraps, or inconsistent detailing at the bottom, you do not get predictable drainage. You get wet pockets.
Vents, Bug Screens, And Terminations
Terminations are where many rainscreens fail in real homes. If the bottom termination blocks drainage, water can linger. If venting is missing or clogged, drying potential drops. If insect screening is not handled well, the assembly can become a pest path or a debris trap.
In the Lower Mainland, debris pressure is real. Needles, leaves, and dust can build up quickly. The best details are the ones you can actually keep clear without special equipment.
Flashings And Transitions Are The Job
A rainscreen is only as good as its flashings. Most bulk water issues originate at windows, doors, deck interfaces, roof-wall intersections, and service penetrations. These are the points where the assembly changes direction and multiple trades touch the same detail.
When you plan rainscreens early, you are really planning transitions. The wall field is usually straightforward. The edges are where durability is decided.
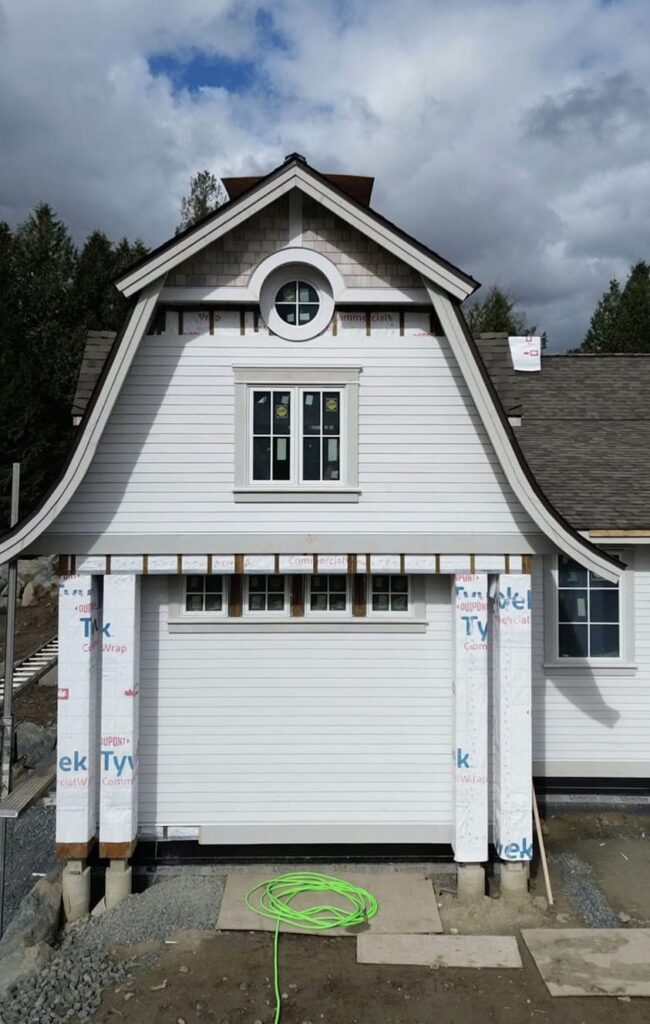
What Rainscreen Changes In Your Design And Drawings

Rainscreens do not just change “what’s behind the cladding.” They change the architecture. Wall thickness, trim depths, window returns, and exterior expression all shift once you account for the cavity, WRB, and cladding attachment.
That is why it is risky to leave rainscreen thinking until late design. You can end up with window packages and exterior detailing that do not fit the assembly you actually need.
Wall Thickness, Window Returns, And Exterior Depth
A rainscreen adds depth. That extra depth changes how deep window returns feel inside, how trims and sills are proportioned outside, and how cleanly you can detail corners and transitions.
It also affects how windows sit relative to the drainage plane and where flashings need to go. If windows are selected and elevations are finalized before the rainscreen strategy is clear, you often end up with last-minute “fixes” that look bulky or create water traps.
The practical planning move is to decide your cladding direction and rainscreen approach before you lock in window placement details and exterior trim language.
Structural Attachment And “Can We Hang It Here?”
Every exterior element you attach has to respect the WRB and the drainage plane. Railings, canopies, exterior lights, hose reels, and even address plaques can become leak points if attachment is improvised in the field.
A good drawing set anticipates these attachments and provides a plan for how they tie in without puncturing the WRB in uncontrolled ways. It is much easier to plan backing, blocking, and attachment locations early than it is to patch holes later.
This is also where collaboration matters. The architect, builder, and cladding trade need the same intent, or you end up with a system that is technically “rainscreened” but practically fragile.
Deck Ledgers, Guard Posts, And Exterior Stairs
Deck interfaces are high-risk because they combine structure, penetrations, and water exposure. If the detail does not show how the assembly drains and how penetrations are managed, it becomes a common place for long-term moisture problems.
Guard posts and stairs add more penetrations and more opportunities for water to be directed into assemblies. A rainscreen detail that looks fine on paper can still fail if these penetrations are not planned, flashed, and located with drainage in mind.
This is one of the strongest reasons to keep penetrations grouped and intentional, and to avoid “we’ll decide that later” exterior features.
Penetrations And Services
Service penetrations are where long-term risk accumulates. Vents, hose bibs, electrical outlets, and fixture mounts tend to be installed by different trades at different times. If the plan does not show a consistent approach, the WRB can become a patchwork.
A simple rule works well: fewer penetrations, grouped penetrations, and repeatable details. If you plan penetrations early, you get fewer surprises during rough-ins, and you reduce the number of unique leak risks to manage.
For custom homes, grouped and planned penetrations also support better exterior aesthetics. Scattered penetrations usually look messy and are harder to maintain.
Rainscreen Components And What To Confirm

Rainscreen Components At A Glance
| Component | What It Does | What Goes Wrong | What To Show On Drawings |
| Cladding | Sheds most rain and protects the wall | Leaky joints, water trapping at details | Cladding type, fastening concept, corner/trim approach |
| Rainscreen Cavity | Provides drainage and drying space | Blocked drainage, crushed space, dead zones | Cavity concept at openings, base, and top terminations |
| WRB (Second Plane) | Continuous water control behind cladding | Gaps at transitions and penetrations | WRB continuity notes, tie-ins at openings and edges |
| Flashings | Directs water out, especially at openings | Missing, reversed, or discontinuous flashings | Window/door head/sill details, deck interface details |
| Terminations (Top/Bottom) | Lets water drain and supports drying | Blocked vents, missing bug screens, debris traps | Base-of-wall details, vent/screen detail at openings |
If you cannot point to where these are addressed on the drawings, it is a sign the rainscreen is being treated as a general assumption instead of a designed system.
A Homeowner Checklist: What To Plan For Before You Approve The Set
You do not need to be an envelope expert to review rainscreen readiness. You do need a checklist that targets the places where rainscreens succeed or fail: openings, terminations, penetrations, and attachments.
Rainscreen Planning Checklist For Coastal BC Homes
Before you approve the construction set, confirm you can answer these:
- Cladding direction is known (even if the exact product is still being finalized)
- Drainage and drying intent is clear (how the cavity drains, where it vents)
- Window and door sill, jamb, and head flashing details are shown
- Base-of-wall termination and clearance to grade are addressed
- Deck interfaces, guard posts, and exterior stair connections are detailed
- Roof-wall transitions and balcony intersections are called out
- Terminations include a strategy for insects and debris (screening and access)
- Attachment points are planned for exterior lights, canopies, and railings
- Penetrations are grouped where feasible and use repeatable details
- The inspection and sequencing plan is understood before cladding starts
- Maintenance expectations are realistic for your lot conditions (trees, debris)
- Responsibility is clear: who installs what layer, and who verifies continuity
If your team cannot answer most of these without guessing, you are likely carrying envelope risk into construction.
Use A Drawing Review Process That Targets Risk Areas
A general drawing review often focuses on layout, finishes, and budgets. For rainscreens, you also want a focused review of transitions and details, because that is where water and air control lives.
Knowing how to review architectural drawings effectively means targeting openings, base terminations, and penetrations first, which is where envelope risk is highest.
Permits And Inspections: Plan The Sequence So You Don’t Lose Time
Rainscreen work has “one-way door” moments. Once cladding is installed, you cannot easily confirm WRB continuity or fix missed flashings without opening the wall. That is why sequencing and inspection planning matter as much as design intent.
If you plan the inspection path early, you reduce the risk of rework, delays, and uncomfortable conversations after the walls are closed.
Why Envelope Sequencing Matters
Sequencing is where good designs get protected. The WRB has to be installed continuously, transitions have to be complete, and critical flashings have to be in place before the cavity and cladding cover them.
This is also why last-minute exterior changes are risky. A late decision to add a light, move a hose bib, or change a deck detail can create unplanned penetrations that are harder to integrate cleanly. A well-sequenced project treats penetrations like planned scope, not a field decision.
What Usually Needs To Be Shown In A Permit Set
Permit sets vary, but they typically need enough clarity that the city can understand the assembly intent and key life-safety and code concepts. The more unusual the wall system and detailing, the more you benefit from clear sections and details.
The building permit drawing set requirements for Vancouver define how much envelope intent needs to be communicated so the city can assess the assembly and key life-safety considerations.
The main goal is not to overwhelm the permit set. It is to avoid leaving critical envelope information to assumptions that cannot be inspected later.
Vancouver-Specific Inspection Mindset
Vancouver’s rainscreen bulletin covers both design and inspection expectations for one- and two-family dwellings, and the level of envelope clarity it describes is a reasonable target regardless of municipality.
Even if you are outside Vancouver, the same lesson applies: the more you can show and verify before cladding, the less envelope risk you carry into occupancy.
Common Rainscreen Mistakes In Coastal BC Homes
Most rainscreen failures are not “mysterious.” They come from predictable breakdowns at the edges, or from details that were never clearly owned by any trade. If your goal is durability, you want to avoid novelty and focus on clear, repeatable details.
Treating Rainscreen Like “Strapping Only”
A cavity exists does not automatically mean a rainscreen works. If the bottom termination traps water, or if the top termination blocks drying, the system can hold moisture where you do not want it.
This mistake often happens when rainscreen is treated as a single line item instead of a system. The wall looks “rainscreened” in description, but no one can point to the details that make it drain and dry.
A good question to ask is: “Where does water that gets behind the cladding go?” If the answer is not clear, the design needs more work.
Missing Continuity At Windows And Doors
Windows and doors are the highest-frequency risk zones. Water concentrates there. Multiple trades touch those details. If the WRB tie-in and flashing intent is not clear at every opening, you end up with inconsistency.
Sills are especially important because that is where water wants to sit. If the sill detail does not drain and the WRB continuity is vague, you can create a long-term wet pocket that is hard to detect until damage appears.
The fix is not complexity. It is clarity. Repeatable opening details, shown in sections, and used consistently.
Blocking The Drainage And Venting Path
Drainage paths get blocked by debris, by incorrect terminations, and by well-intentioned “sealing” that closes off the space where the wall should drain. In coastal BC, debris is a fact of life, especially near trees.
If the wall cannot drain cleanly at the bottom, it becomes dependent on drying alone. During long wet seasons, drying alone may not be enough.
This is why we treat terminations and access as design decisions, not afterthoughts.
Unplanned Penetrations After The Fact
Many penetrations are added late. Exterior lights get moved. Hose bibs get added. A new vent is required. If the drawings do not anticipate these, they tend to be drilled in the field and patched in a way that may not preserve WRB continuity.
The best prevention is planning: group penetrations where feasible, define repeatable penetration details, and keep a clear record of what is allowed and how it must be sealed.
It is also a schedule issue. Late penetrations create rework and inspection risk because they often occur after key layers are already installed.
No Maintenance Plan For Real Life
Rainscreens are not “set and forget.” In the Lower Mainland, you need a realistic plan for keeping terminations clear and managing debris at the base and around details.
A good rainscreen detail makes maintenance easier by design. It avoids hidden traps, provides access where needed, and does not rely on perfection. If your home is surrounded by trees, plan for that reality from day one.
Roof Moisture Strategy Still Matters
Walls are only one part of coastal durability. Roofs deal with heavy rain, wind-driven rain, and debris pressure too. If your project has complex rooflines, multiple valleys, or low-slope features, roof moisture strategy and maintenance access become part of the same risk conversation as rainscreens.
Roof assemblies for West Coast climate follow the same moisture-control logic as rainscreen walls, and planning both together reduces the chance of envelope gaps that only surface after construction.
Planning the wall and roof strategies together is one of the simplest ways to reduce surprise costs and improve long-term performance.
How We Plan Rainscreen Details Early
A rainscreen is only as strong as its details and sequencing. When you plan it early, you avoid the late-stage redesign that happens when wall thickness, window returns, and attachment points were never coordinated for a wet coastal climate.
At Versa Homes, we build that coordination into the process with fixed-price contracts once scope is defined, a detailed build schedule with pre-booked trades, and a client portal that keeps drawings, decisions, and progress photos organized from day one. When rainscreen planning needs to be integrated from the earliest design conversations, that is what our custom home architectural design process is built around.
Frequently Asked Questions
Are Rainscreens Required For All Homes In Coastal BC?
Many coastal projects treat rainscreens as a baseline durability strategy, but “required” can vary based on local enforcement and the assembly approach. The safest approach is to plan for a rainscreen, then confirm requirements and documentation expectations with your municipality and project team.
What Is The Difference Between Rainscreen, Drained Cavity, And Capillary Break?
A drained cavity is the space that lets water run down and out. A capillary break is the separation that stops water from being pulled across materials by capillary action. A rainscreen usually includes both concepts plus terminations and flashings so the system can drain and dry.
Does A Rainscreen Make My Walls Thicker?
Yes. The cavity and cladding attachment add depth, which can affect window returns, trim profiles, and the overall exterior expression. That is why rainscreen decisions should happen before window and elevation details are finalized.
Where Do Rainscreens Fail Most Often?
Common failure zones include windows and doors (especially sill details), deck and guard penetrations, service penetrations, and blocked terminations that prevent drainage and drying.
What Should Be Shown On Drawings For A Rainscreen Wall?
Look for clear opening details, base-of-wall terminations, top terminations, penetration details, and planned attachment points for exterior features. If the drawings do not show continuity and drainage intent, the wall often gets built inconsistently.
Do I Need Special Inspections For Rainscreen In Vancouver?
Vancouver has specific guidance covering rainscreen design and inspection expectations for one- and two-family dwellings; confirm your project’s specific requirements with the city and your design team.
How Do I Maintain A Rainscreen In A Wet Climate?
Keep bottom terminations clear of debris, monitor sealants and flashings as part of routine home ownership, and ensure water is not being directed into wall details by landscaping or poorly managed drainage.
Does Cladding Type Change Rainscreen Requirements?
Cladding choice changes detailing and fastening, but the core intent stays the same: provide a drainage and drying space, keep the WRB continuous, and detail openings and terminations so water can get out.


Felipe Freig
Founder of Versa Homes
Felipe Freig is the founder of Versa Homes, a Vancouver custom home builder known for architecturally driven, fixed-price projects. With years of hands-on site experience and deep permitting and by-law knowledge, Felipe leads high-performance teams that deliver precision craftsmanship, clear budgets, and on-schedule luxury homes.
You May Also Like...

City Vs. Suburban Living: What’s Right for Your Custom Home Build?
Bearing the Weight: The Crucial Role of Foundation Walls in Your Home

Embrace the Future: Maximizing Smart Technology in Your Custom Home

Wildland-Urban Interface (WUI): Design Basics For Edge-Of-City Lots

What is the difference between cost plus and fixed price?
Crafting the Foundation: Navigating the Framing Process in Custom Home Construction
Local vs. National Custom Home Builders: Making the Right Choice for Your Project

Best Places to Build a Custom Home in Greater Vancouver