
If you’re comparing HRV vs ERV and searching for HRV ERV placement in floor plans, the short answer is this: the “best” system is the one that matches your humidity goals and can be placed and ducted cleanly. In many custom homes, placement and routing affect comfort, noise, and long-term maintenance just as much as whether you choose an HRV or ERV. In our custom home builds, we coordinate unit location, chases, and exterior terminations early so they don’t end up fighting the structure and lighting later.
This guide is designed to help you make a confident decision without turning you into a mechanical designer. You’ll learn the practical differences between HRVs and ERVs, what typically drives the choice in Greater Vancouver, where the unit should live in your plan, and what duct routes tend to stay quiet and serviceable.
By the end, you should be able to look at your floor plans and ask the right questions: Where does the unit go, where do ducts run, how do we keep it quiet near bedrooms, and how will someone actually maintain it five years from now.
HRV And ERV Basics
An HRV and an ERV are both “balanced ventilation” systems. They bring fresh outdoor air in and exhaust stale indoor air out, while recovering energy from the outgoing air stream to reduce heating losses.
Where they differ is how they handle moisture. That moisture difference matters most when your home is tighter (more airtight), because ventilation becomes the main way you control indoor air quality and humidity.
HRV Vs. ERV: Quick Comparison
The “best fit” depends on your home’s design, your household moisture patterns, and how the system will be installed and commissioned.
| Feature | HRV | ERV |
| Transfers Heat | Yes | Yes |
| Transfers Some Moisture | No | Yes |
| Typical Use Case | Simple heat recovery focus | Heat plus some humidity moderation |
| Sensitive To Placement And Duct Runs | High | High |
| Maintenance Sensitivity | High | High |
The takeaway for custom homes is that the decision is rarely “HRV good, ERV bad” or the opposite. The more reliable approach is: pick the system that matches your humidity goal, then protect performance with a placement-first floor plan.
What An HRV Does
An HRV (Heat Recovery Ventilator) transfers heat from outgoing air to incoming air. It’s designed to improve indoor air quality while reducing the energy penalty of ventilation.
In plain terms, an HRV is often thought of as the simpler option: it focuses on heat recovery and doesn’t intentionally transfer moisture between the air streams. In homes where moisture control is a priority, that “no moisture transfer” characteristic can be part of the appeal.
An HRV still needs good placement and duct design. A great box installed in a poor location with messy routing can feel noisy, uneven, and hard to maintain.
What An ERV Does
An ERV (Energy Recovery Ventilator) transfers heat and also transfers some moisture between the outgoing and incoming air streams. The goal is to reduce big humidity swings by moderating how much moisture leaves (or enters) with ventilation.
In practice, an ERV can be helpful if you’re trying to avoid air that feels too dry during heating season, or if you want ventilation that’s a bit more “humidity aware” overall. Whether that helps or hurts depends on your actual indoor humidity patterns, which vary by household and by how the rest of the mechanical system is designed.
Like an HRV, an ERV’s real-world performance depends on layout, commissioning, and maintenance. The moisture feature does not compensate for poor duct routing or poor service access.
The Key Difference To Remember
If you want a simple rule of thumb: HRV transfers heat. ERV transfers heat plus some moisture.
The second rule of thumb is more important in custom homes: the unit you can place well and maintain easily will usually outperform the unit you hide in a bad location. That’s why floor plan placement deserves as much attention as the equipment selection.
HRV Vs ERV In Greater Vancouver: What Usually Drives The Decision

Greater Vancouver is a mild, wet climate. That tends to shift the conversation away from extreme cold and toward year-round comfort, moisture management, and avoiding issues like window condensation, musty smells, or stale air in tight rooms.
You can make either system work well here. The right choice usually comes from a clear humidity goal, a clear understanding of how airtight the home will be, and a practical plan for placement and routing.
Start With Your Humidity Goal
Start by deciding what problem you’re trying to solve. Some homeowners want to avoid air that feels dry during heating season. Others want to reduce indoor humidity and the risk of condensation, especially in winter when warm indoor air meets colder window surfaces.
In Vancouver-area homes, you’ll often see moisture generated by daily life (showers, cooking, laundry), plus a lot of rainy-season habits (drying gear, wet coats, frequent showers). Your ventilation strategy should match that reality.
A helpful question for your design team is: “Do we expect this home to run too dry, too humid, or fairly balanced most of the year?” That question leads to a better HRV vs ERV decision than brand comparisons do.
Airtightness Changes The Stakes
As homes become more airtight, ventilation matters more. In a tighter home, you’re relying on a planned system to deliver fresh air consistently, manage indoor moisture, and keep the home feeling comfortable in every season.
If you’re targeting higher performance, it helps to understand how ventilation fits into the broader energy and enclosure strategy. The BC Energy Step Code for custom homes sets out why mechanical planning becomes more critical as airtightness improves.
This is also where placement becomes a deciding factor. A tighter home with a poorly placed unit and long duct runs can feel louder and less balanced than a slightly less tight home with a cleaner, shorter, well-commissioned layout.
Where To Place An HRV Or ERV In Your Floor Plan
In custom homes, placement is where projects either win or lose. The best placement keeps duct runs short, keeps the unit accessible, and avoids creating noise near bedrooms and quiet spaces.
A good plan makes the system easy to service and hard to “accidentally break” through later renovations or storage habits.
The Best Locations Usually Share Three Traits
The 3 traits: they’re inside conditioned space, they’re close to the centre of the duct runs, and they’re easy to access for filter changes and core cleaning.
Conditioned space matters because you want the unit and ducts to operate in a stable environment and avoid condensation risk on cold surfaces. Central placement matters because every extra metre of duct adds resistance, cost, and potential noise.
Access matters because maintenance is not optional in real life. If the unit is behind a stacked storage closet or requires a ladder and a contortion act, filters won’t get changed on schedule, and performance will drop.
Mechanical Room, Laundry, Or Utility Space: Pros And Cons
A dedicated mechanical room is often the cleanest option. It supports service access, keeps equipment grouped, and makes it easier to coordinate duct routes, drains, and controls. The trade-off is that you need to reserve enough space and plan sound control so it doesn’t bleed noise into living areas.
Laundry rooms and utility spaces can also work well, especially in plans where they sit near the centre of the home. The risk is clutter and conflict. If the room becomes the de facto storage zone, access can disappear, and the “nice on paper” layout becomes a maintenance headache.
Basement placement can be workable, but it can also lead to longer duct routes, which affects noise and balancing. Main-floor placement can shorten duct runs, but you need to plan chases and avoid turning a great ceiling design into a series of last-minute bulkheads.
Clearance And Service Access
Service access is not just “can I reach it?” It’s “can I comfortably replace filters, open the core, clean it, and inspect connections without disassembling half the room?”
You also want practical clearance for the condensate drain (if applicable), controls, and any future servicing. A unit that is technically reachable but practically blocked tends to get ignored over time.
When you review floor plans, look for a clear working zone in front of the unit, a door that opens fully, and a path that doesn’t require moving appliances or shelving every time maintenance is due.
Duct Routing And Register Locations: Make The Plan Quiet And Effective
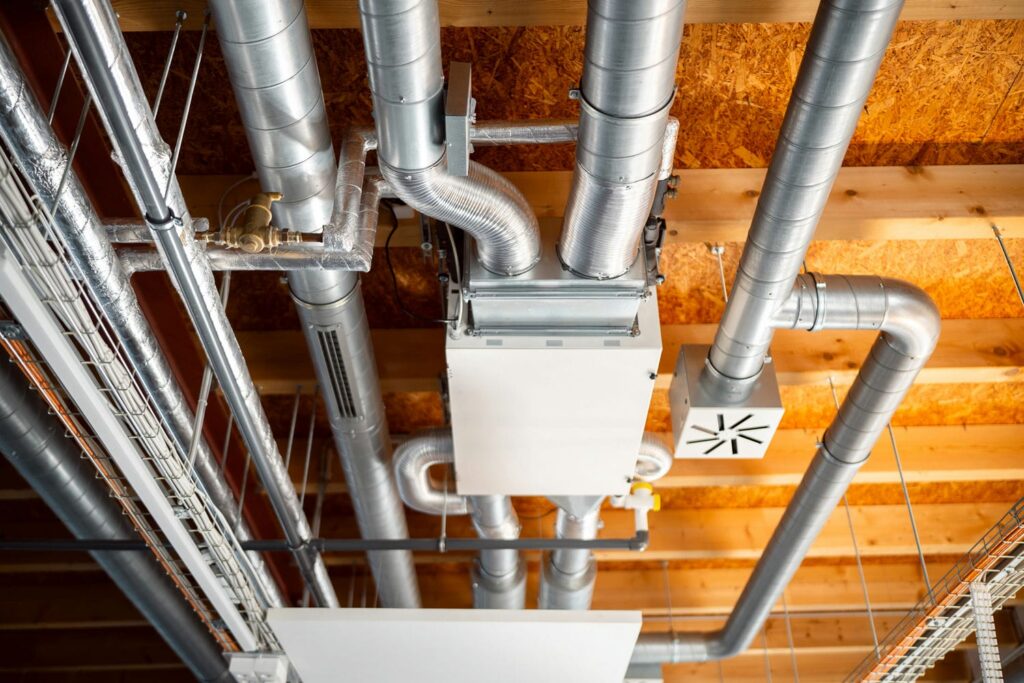
A quiet, effective system is usually a sign of a good duct layout. Noise and uneven airflow often come from long duct runs, sharp turns, undersized chases, or supply and exhaust points that weren’t planned early.
This is also where custom homes can get tricky. Architectural ceilings, beams, and lighting plans can conflict with duct routes if they’re not coordinated from the start.
Keep Main Trunk Runs Short And Simple
Shorter, simpler trunk runs generally reduce resistance and help the system deliver the airflow it was designed for. Every extra turn, constriction, and long run adds friction and can push the system toward higher fan speeds, which is where noise complaints often start.
This is why “unit location” and “duct routes” are a single decision. A perfect unit placed at the far end of the house can force duct spaghetti across the ceiling, and you’ll feel that in both sound and performance.
A good floor plan often shows a clear path for the main trunks before finishes are finalized. If you can’t trace the route without guessing, that’s a sign you need more mechanical coordination.
Plan Chases And Soffits Early
Chases and soffits aren’t a failure. They’re a planning tool. The problem is when chases show up late and steal ceiling height in the rooms you care about most.
Planning chases early lets you control where bulkheads live, keep them in hallways or secondary areas, and preserve clean ceiling lines in main living spaces. It also reduces the chance that ductwork ends up squeezed into undersized cavities that add noise.
When you review plans, ask: “Where are the main vertical and horizontal routes?” If the answer is “we’ll figure it out later,” you’re likely paying for it later in compromised ceilings or added labour.
Supply And Exhaust Locations
At a high level, supply air is typically delivered to living spaces and bedrooms, while exhaust air is typically pulled from moisture and odour areas like bathrooms and laundry zones. The goal is consistent fresh air where you spend time, and moisture control where it’s generated.
In custom homes, placement is about comfort. You want supply locations that avoid drafts on seating areas and beds, and you want exhaust locations that actually capture moisture at the source.
This is also where “quiet” is designed. A register placed in the wrong location can create perceived noise even if the equipment is fine. Good placement avoids blasting air across a room and avoids locating noisy elements against quiet spaces.
Common Layout Mistakes To Avoid
Most layout issues are predictable and fixable early. Common ones include placing the unit far from the centre of the home, forcing long duct runs and extra turns, or failing to plan a chase path so ducts end up boxed into visible bulkheads.
Another common mistake is forgetting service access. If the design treats the HRV/ERV as something you can hide behind millwork, the system becomes harder to maintain, and performance drops over time.
A final issue is forgetting that registers and ducts share space with lighting, beams, and cabinetry. Coordination is cheaper on paper than it is after framing.
Outdoor Intake And Exhaust Placement
Even the best interior layout can be undermined by poor exterior termination locations. Intake and exhaust placement affects air quality, odours, noise, and whether the system accidentally pulls in what it just exhausted.
Exterior placement also matters in the Lower Mainland because wind-driven rain and debris can create maintenance problems if terminations are exposed and hard to access.
Separation And Location Matter
Intake and exhaust should be located to reduce the chance of short-circuiting, where exhaust air gets pulled back into the intake. This is a planning issue, not a product issue.
You also want to avoid locating the intake near common contamination sources like driveways (exhaust fumes), barbecues, or other vents. In a tight home, small placement mistakes can have a noticeable impact on perceived air quality.
A good plan shows these terminations clearly, not as an afterthought. If the exterior points aren’t identified on drawings, they tend to land wherever it’s easiest for routing, not where it’s best for long-term comfort.
Rain And Wind Exposure In The Lower Mainland
Wind-driven rain is real in coastal BC. Terminations in highly exposed locations can face more moisture, debris, and service issues over time.
Sheltered placement, durable detailing, and a clear maintenance plan help. This is especially important if the termination is above a roof, behind landscaping, or in an area that’s hard to reach safely.
When you review the plan, it’s worth asking how those terminations will be inspected and cleaned. If access requires special equipment, it’s more likely to be neglected.
How HRV/ERV Interacts With The Rest Of Your Mechanical Plan
An HRV/ERV doesn’t operate in isolation. It interacts with your heating and cooling system, your exhaust equipment, and how you use the home day to day.
This is why the best HRV vs ERV decision usually happens as part of an integrated mechanical plan, not as a standalone shopping choice.
Range Hoods, Bath Fans, And Laundry Exhaust
Range hoods and exhaust fans move air out of the home. In a tight home, large exhaust events can affect pressure balance, comfort, and how outside air enters the building.
From a planning perspective, the key is coordination. Your mechanical designer should account for how big exhaust loads will be handled and how the home will stay comfortable and safe during those loads.
For homeowners, the practical takeaway is simple: don’t decide on a powerful range hood or unusual exhaust setup without confirming how it interacts with the ventilation plan.
Heating And Cooling Integration
An HRV/ERV is a ventilation system. It supports indoor air quality and moisture management, but it’s not a substitute for heating and cooling design.
In custom homes, the question is usually, “How does ventilation fit into the whole system?” Understanding how your home’s HVAC system works helps clarify how ventilation, heating, and cooling each play a different role within the overall system.
Integration also affects layout. If mechanical equipment is scattered, duct runs get longer and coordination gets harder. A compact, planned mechanical zone usually supports a cleaner ventilation layout.
When To Decide: The Design And Construction Timing That Prevents Rework

Ventilation planning is easiest when it’s done early. Once structure and lighting are finalized, and once rough-ins begin, your options shrink fast.
If you want a quiet, clean system, treat HRV/ERV placement as part of early planning, not as a late equipment decision.
Decide Placement Before Structural Details Are Locked
Duct routes compete for space with beams, bulkheads, and recessed lighting. If ventilation is decided late, the common outcome is compromised ceiling design or long, noisy duct routes forced through tight cavities.
Early placement lets you plan chases in the right locations and keep your best ceiling lines intact. It also makes it easier to locate the unit away from quiet rooms while still staying central to the duct runs.
A useful checkpoint is the first time you review reflected ceiling plans or major structural elements. If ventilation isn’t coordinated by then, you’re likely heading toward rework.
Rough-Ins And Insulation Are A One-Way Door
Once rough-ins and insulation are underway, changes become costly. Penetrations, wiring for controls, and duct placement all tie into air sealing and finish planning.
This is why we like to confirm ventilation placement before the home hits the “close it up” stage. The same logic applies to electrical rough-in before insulation: once that phase closes, decisions that were easy to adjust become costly to change.
Good planning here reduces drywall rework, bulkhead surprises, and last-minute compromises that can affect system noise and service access.
Commissioning And Maintenance
Even a well-designed HRV/ERV needs commissioning and basic maintenance. Without those, performance drifts. Airflow becomes unbalanced, indoor air quality can suffer, and the system can get louder as it works harder to push air through dirty filters.
The best time to plan maintenance is during your custom home design, because maintenance depends on access. If the unit is hard to reach, maintenance won’t happen consistently.
Balancing Matters More Than People Think
Balancing is the process of verifying that airflow matches the design intent. It’s what turns a “connected” system into a “working” system.
Homeowners often assume that if air is moving, the system is fine. In practice, poor balance can leave some rooms feeling stale while others feel drafty. It can also worsen noise if the system is running harder than it needs to.
A simple expectation to set during planning is that commissioning and balancing are part of completion, not an optional extra. It protects comfort and makes the investment worthwhile.
Filters, Core Cleaning, And Condensate Management
Most owners will interact with the system through filter changes and periodic cleaning. Those tasks are straightforward when access is good and frustrating when access is poor.
Condensate management also matters, depending on the unit and configuration. The key planning point is not the detail of the drain itself, but ensuring it’s accessible, visible enough to check, and not hidden behind finished elements.
When you review floor plans, look for a location that supports real maintenance behaviour, not just theoretical access.
A Practical Placement Checklist You Can Use In Floor Plan Reviews
If you’re not a mechanical professional, a checklist helps you review drawings without guessing. The goal is to confirm the system has a logical home in the plan and a logical path through the home.
This is also a good list to use when you’re comparing two floor plan versions. Often the right answer isn’t “HRV vs ERV.” It’s “Option A allows clean placement, Option B forces compromise.”
HRV/ERV Placement Checklist For Floor Plans
Before you approve plans, check for these items:
- Unit is located in conditioned space, not in an awkward unconditioned corner
- Clear working access is shown or realistically available for filter and core servicing
- Main trunk routes are short and traceable, not a maze of long runs
- Chases and soffits are planned early, not added after ceiling design is finalized
- Unit is not placed against a primary bedroom wall or other quiet-zone wall
- Outdoor intake and exhaust locations are identified on elevations or notes
- Intake and exhaust are located to reduce short-circuiting and nuisance issues
- Condensate plan (if applicable) is practical and accessible
- Electrical power and controls have a clear path and location
- Key service points (dampers, access panels) are not buried behind millwork
- The system has a commissioning and balancing plan at completion
- Maintenance responsibilities are clear, including filter replacement expectations
If more than two or three of these items are unclear on the drawings, that’s a sign you need more mechanical coordination before you finalize.
Add “Ventilation Notes” To The Mechanical Plan
A small “Ventilation Notes” box on the mechanical plan can prevent the intent from getting lost when drawings evolve. It can state the unit location, the intended chase paths, key termination locations, and basic maintenance access requirements.
This doesn’t need to be technical. It needs to be clear. When intent is written down, it survives value engineering and late-stage coordination changes more often.
For homeowners, this also creates a single place to reference when you’re trying to understand what the plan is supposed to do, instead of hunting through details.
Code And Local Guidance: A Baseline For Reviewing Plans
You don’t need to become a code expert to make good decisions, but it helps to know where to look for credible baseline guidance. For many homeowners, the best approach is to use a plain-language guide plus a code baseline reference, then rely on your designer to interpret how it applies to your specific home.
City Of Vancouver HRV/ERV Guide
The City of Vancouver publishes a “Heat Recovery Ventilation Guide for Houses” that explains practical considerations around ventilation design and implementation. Even if you’re building outside Vancouver proper, it’s a useful plain-language reference for how balanced ventilation is commonly approached in residential projects.
Use it as a baseline for questions like: What should be shown on plans, what are common pitfalls, and what does good execution tend to include. It’s not a substitute for project-specific mechanical design, but it’s a strong sanity check.
BC Building Code Ventilation Requirements
For the code baseline, BC Building Code Part 9 includes ventilation requirements and concepts that establish minimum expectations for residential ventilation. This is helpful context, but it is not something most homeowners should try to apply directly without a professional.
The practical takeaway is that “ventilation” is not a nice-to-have in a custom home. It’s a core building system that should be designed, documented, and commissioned in a way that fits how you’ll actually live in the home.
Common HRV/ERV Mistakes In Custom Homes
Most HRV/ERV problems come from predictable planning mistakes. The equipment may be fine, but the layout, routing, and access weren’t solved early enough, so the system ends up noisy, hard to maintain, or uneven room to room.
Choosing The Unit Before You’ve Solved Placement
It’s tempting to start with brand and model. In custom homes, that often leads to the wrong conversation first. Placement and routing determine whether a system can be balanced cleanly and maintained reliably.
A better approach is to solve placement and routing first, then choose the unit that fits the plan. This tends to reduce rework and keeps the decision grounded in the realities of your layout.
If your plan doesn’t show a clear home for the unit and clear routes for ducts, the unit choice is premature.
Prioritizing Hidden Installs Over Serviceability
Hidden installs look clean on day one and become frustrating by year three. Filters don’t get changed, cores don’t get cleaned, and the system slowly loses performance.
Serviceability is part of performance. If you want good indoor air quality long term, the system has to be easy enough to maintain that it actually gets maintained.
When you review plans, treat access like a requirement, not a preference. It will pay back in comfort and fewer service calls.
Treating Ventilation As An Afterthought
Ventilation often gets pushed behind finishes, lighting, and millwork decisions. Then it returns as a late-stage bulkhead, a noisy run through a tight cavity, or a termination placed wherever it fits.
Treating ventilation as early planning protects your ceiling design and reduces labour. It also tends to produce quieter systems because the ductwork can be routed cleanly instead of forced around obstacles.
If a plan revision adds complexity to the rooflines or ceilings, it’s worth asking how that change affects ventilation routing.
Ignoring Moisture Risk In A Wet Coastal Climate
In a wet coastal climate like the Lower Mainland, indoor moisture management matters for comfort and durability. If ventilation is undersized, poorly routed, or poorly commissioned, it can show up as window condensation, lingering odours, and musty areas in closets or secondary rooms.
Ventilation is one piece of a moisture-smart home, alongside enclosure design and practical day-to-day habits. The same principles that shape designing for rainy climates apply here: moisture management is a whole-home decision, and ventilation is one part of it.
The key is not to overcomplicate it. Decide your humidity goal, plan placement and access, and make sure the system is commissioned properly.
Work With Versa Homes To Get Ventilation Right
Quiet, effective ventilation starts with a floor plan that makes sense for the equipment. When HRV/ERV placement is solved early, you avoid late bulkheads, long noisy duct runs, and “we’ll figure it out in the field” compromises that are hard to undo once framing and insulation are in.
We help you coordinate these decisions as part of the custom home planning process, alongside structure, lighting, and envelope details. That coordination is supported by fixed-price contracts once scope is defined, a detailed build schedule with pre-booked trades, and a client portal that keeps decisions and progress documentation organized with daily logs and photos. If you’re designing a new home in Greater Vancouver, work with a custom home builder that plans ventilation into the early design conversations, not as an afterthought.
Frequently Asked Questions
What Is The Difference Between An HRV And An ERV?
An HRV transfers heat between exhaust and supply air. An ERV transfers heat and also transfers some moisture. The best choice depends on your humidity goals and how the system is designed and commissioned.
Which Is Better In Greater Vancouver: HRV Or ERV?
Either can work well. In practice, the better choice is the one that matches your comfort and humidity goal and can be placed and ducted cleanly in your floor plan.
Where Should An HRV/ERV Be Placed In A Custom Home Floor Plan?
Place it in conditioned space with clear service access, ideally near the centre of the duct runs so ducts can stay short, simple, and quieter.
Do HRVs/ERVs Add Noise, And How Do You Avoid It?
They can if duct runs are long, tight, or poorly planned. Shorter trunk runs, planned chases, and keeping the unit away from quiet zones usually reduces noise.
Do I Still Need Bathroom Fans If I Have An HRV/ERV?
You still need an intentional moisture strategy. Confirm with your mechanical designer how spot exhaust and balanced ventilation will work together in your plan.
How Does A Range Hood Affect HRV/ERV Design?
Large range hoods can change pressure balance in tight homes. Plan it early so make-up air and comfort are addressed as part of the mechanical design.
What Maintenance Does An HRV/ERV Need?
Typically filter changes and periodic core cleaning. The most important planning point is access, because maintenance is only consistent when the unit is easy to reach.
What Should I Look For On Drawings Before I Approve The Plan?
Look for a clear unit location and clearance, planned main duct routes, chases and soffits, exterior intake and exhaust locations, and a commissioning note.


Felipe Freig
Founder of Versa Homes
Felipe Freig is the founder of Versa Homes, a Vancouver custom home builder known for architecturally driven, fixed-price projects. With years of hands-on site experience and deep permitting and by-law knowledge, Felipe leads high-performance teams that deliver precision craftsmanship, clear budgets, and on-schedule luxury homes.
You May Also Like...

5 Stunning Landscaping Ideas to Enhance Your Custom Home

Vancouver Building Permit Drawing Set: What Your Application Must Include


What to Ask a Custom Home Builder Before You Hire Them

5 Reasons to Build a Custom Home & Live in Langley, BC

Building Bonds: Tips for Crafting a Multi-Generational Custom Home

Embracing the Power of Technology in Your Custom Home


